Introduction
Up until recently, users of Terraform Cloud really had two main options for authentication of Terraform into public cloud environments:
- Passing static credentials to Terraform as variables stored in Terraform Cloud.
- Deploying Terraform Cloud private agents in the respective cloud environment and making use of their platform provided identity service (such as Azure Managed Service Identities).
Whilst there was nothing inherently wrong with either of these, they presented a number of challenges. Static credentials resulted in long-lived secrets and the need to manage ongoing rotation/revocation (no one ever forgets to renew their secrets – right?!). Whereas the platform provided identities applied to the agent VM/container as a whole, so there was no easy way of differentiating between different workspaces, without deploying multiple agents, which clearly doesn’t scale well.
This was until recently anyway, when HashiCorp announced support for dynamic provider credentials for both Vault and the three main public clouds – https://www.hashicorp.com/blog/terraform-cloud-adds-dynamic-provider-credentials-vault-official-cloud-providers.
Dynamic Provider Credentials Support
With this new capability, Terraform Cloud is able to act as a trusted identity provider (IdP), issuing cryptographically signed identity tokens to Terraform operations across different workspaces. The Terraform agent performing the operation can then swap this identity token with one of the supported platforms for a short-lived, just-in-time dynamic credential that has pre-defined permissions within the environment being deployed to.
This means you no longer need permanently assigned, static credentials, nor will you need to manage the associated burdens such as ongoing rotation and revocation. Great news!
A Walkthrough
Let’s walk through this functionality, using a simple deployment to Microsoft Azure as an example. To do this quickly, we are going to make use of the example code that HashiCorp has published on GitHub which can be found here – https://github.com/hashicorp/terraform-dynamic-credentials-setup-examples.
Clone the Example Repository
First off, let’s clone the example repository. When we apply this code, it will take care of setting up Azure AD, Azure RBAC and Terraform Cloud for us.
git clone https://github.com/hashicorp/terraform-dynamic-credentials-setup-examples.git
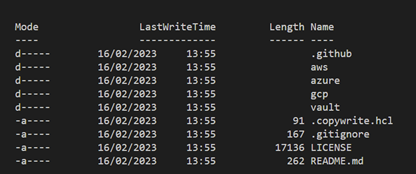
If we look in the cloned folder, we can see that HashiCorp have provided examples for all three major cloud providers, and for HashiCorp Vault.

Setting up the Environment
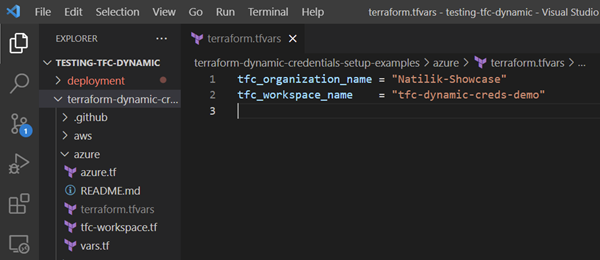
Let’s change into the right directory, rename terraform.tfvars.example, update it with a couple of inputs and run Terraform apply.

At this point, I’m just using local state to quickly build the demo environment, but in reality, this logic would likely form part of project creation automation and be stored securely in Terraform Cloud as well.
Just to be clear, in this step we are just setting up Azure AD, Azure RBAC and a Terraform Cloud workspace that will be capable of utilising dynamic credentials. The deployment we’ve done here is not the one that will actually make use of dynamic credentials – we will see that shortly.
Let’s see what resources we’ve got in state:

Some of the key resources worth calling out are shown below:
- It created an app registration and Service Principal in Azure. This is likely something people are familiar with from the traditional approach to credential generation. Note however, that the code does not create a credential.
- It assigned the Service Principal to the current Azure subscription (taken from a logged in AZ CLI session in my instance) with Contributor-level access.
- Two “federated identity credentials” were created within Azure AD – one for plan and one for apply. These coupled with the special environment variables in the Terraform Cloud Workspace allow Terraform to dynamically generate the required credentials for plan and apply operations when running. More information on federated identity credentials can be found here – https://learn.microsoft.com/en-us/graph/api/resources/federatedidentitycredentials-overview?view=graph-rest-1.0.
- Under the newly created Terraform Cloud workspace, two special environment variables were also created. These variables are used to tell the agent running Terraform that it should utilise this new functionality and sets the App ID (AKA Client ID) to use with the received credential.:
- TFC_AZURE_PROVIDER_AUTH – Set to true to enable dynamic credential provisioning.
- TFC_AZURE_RUN_CLIENT_ID – Set to the application ID (AKA client ID) we registered in Azure AD.
The only additional change I made outside of the standard code was to configure ARM_SUBSCRIPTION_ID and ARM_TENANT_ID environment variables under the Terraform Cloud workspace.
Dynamic Token Exchange
As discussed in the previous section, we are making use of “federated identity credentials”. Essentially, the process that is happening under the food is as follows:
- A Terraform run requests an identity token from Terraform Cloud (one for plan, one for apply).
- Terraform Cloud provides a signed identity token, encoding into it details about the workspace and the project that it is running under. This token is signed by Terraform Cloud.
- The agent executing Terraform then exchanges this identity token with Azure AD for a dynamic credential that can be used with the pre-defined Service Principal App ID.
- Terraform deploys the resources using the Service Principal App ID and newly minted credential, with whatever permissions you defined during the setup (contributor in our demo).
Deploying the Resources
Ok, so we now have Terraform Cloud trusted to issue dynamic identities and we have populated the required variables in our “tfc-dynamic-creds-demo” workspace. Let’s go ahead and deploy some resources using this workspace to see if it works!
In a separate folder I’m going to create a really simple main.tf that will be configured to deploy the following using our newly created Terraform Cloud workspace:
- An Azure Resource Group.
- An Azure Storage Account.
Nothing cutting edge, but it serves as a quick an easy demo. The code is shown below:
terraform {
  cloud {
    organization = "Natilik-Showcase"
    workspaces {
      name = "tfc-dynamic-creds-demo"
    }
  }
  required_providers {
    azurerm = {
      source  = "hashicorp/azurerm"
      version = "3.43.0"
    }
  }
}

provider "azurerm" {
  features {}
}

resource "azurerm_resource_group" "this" {
  name     = "rg-tfc-dynamic-creds-demo"
  location = "uksouth"
}

resource "azurerm_storage_account" "this" {
  name                     = "tfcdynamicdemo"
  location                 = azurerm_resource_group.this.location
  resource_group_name      = azurerm_resource_group.this.name
  account_tier             = "Standard"
  account_replication_type = "LRS"
}
Let’s run Terraform apply…


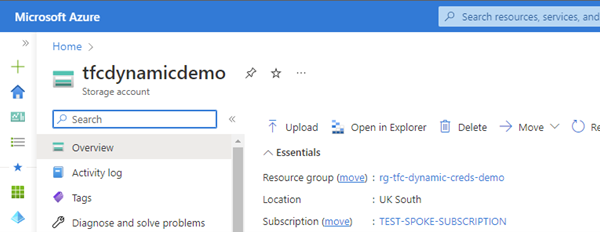
And there we have it. A resource group and a storage account, successfully provisioned in Azure with no credentials hard coded into Terraform Cloud and without using Azure Managed Service identities!
Conclusion
This is a great addition to Terraform Cloud that is going to make narrowly scoped credentials easier to use and without the burden of ongoing rotation/revocation management. This can easily be incorporated into automated project setup, so that each project gets assigned its own Service Principal and permission scope, without the need to store additional secrets.

